Posts

Showing posts from 2015

Eggnog Dip

Image
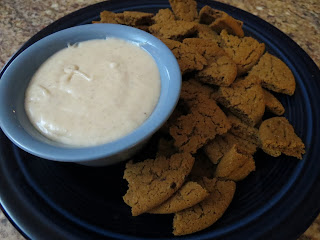
If you still have eggnog from your holiday celebrations, you'll want to use it up making this wonderful, sweet eggnog dip. Chop up some molasses cookies or gingersnaps for dippers and you're all set! Ingredients: 8 oz cream cheese, softened 1/2 cup eggnog 1 cup marshmallow fluff 1 tsp vanilla 1/2 tsp cinnamon 1/4 tsp nutmeg 1 1/2 cups powdered sugar, packed 1. Using a hand mixer, beat the cream cheese in a medium bowl until creamy. 2. With the mixer on low, beat in the eggnog and fluff. Increase speed until completely mixed. 3. Mix in vanilla, cinnamon and nutmeg until combined. 4. Add powered sugar by the 1/2 cup (three times total), combining each completely before adding more. 5. Serve with molasses or gingersnap cookies.

The Top 10 Books I Read In 2015

Image
I've read so many books during 2015. Some were quiet and uplifting while others made me think and desire a change in my life. As with all books that talk about Christianity, faith and other people's interpretations, always compare what you're reading with what God's Word says. You won't agree with everything an author writes, but it must agree with Scripture. Here are 10 of my favorite books from the past year - some are new releases while others are tried-and-true titles. It was terribly hard to narrow it down to 10, especially after giving myself 25 books for Christmas . It was, however, a lot of fun to look back to see what I really did read. Give some of these books a place in your own library. 1. Opening the Door to Your God-Sized Dream by Holley Gerth (2013). This book was instrumental in preparing me to leave my job at the newspaper in February and prepare myself for my dream of working from home. Holley is by far one of my favorite writers, and she

A Handmade 2016 Clothespin Card

Image
Share in the celebration of the New Year by making some adorable cards. They're not designed for mailing, unless you put them in a padded envelope, but they're perfect for hand-delivering. If you raid your stash of embellishments and other fun stuff, you're sure to find something you'd forgotten you had, like these miniature clothespins. Enjoy the search! To make this card, you'll also need three colors of card stock, number stickers and fibers. Adhere the numbers to one color of card stock, then punch then out with a circle punch. After covering your card with the second color of card stock, cut the third color slightly smaller to make a mat. Before tacking that layer down, string your circles across the line with the clothespins, then adhere the string on the back. This will hide the ends of the fiber and create clean lines. Then you can adhere the top layer to the card.

A New Year's Eve Time Capsule Gift

Image
Here is a fun gift you can make today - but you can't give it for a whole year!   Perfectly design for anyone special - spouse, kids, parents, friends - you'll fill a container with special memories and gifts, then tuck it away until next New Year's Eve. They'll have the joy of reminiscing with you as they look through items that meant something to you both 365 days ago. Don't know what to put in it? * A hand-written note * wrapped candy (in a sealed container they should be ok) * heart-shaped items for the one you love * small toys * pictures from this year's special moments * predictions of what the year would hold * a coin from the year you were married * anything that will bring back memories of the two of you together Then wrap it up and put a note on it telling when it can be opened. Then tuck it away and - this is the most important part - make a note on your 2016 calendar, on one of the December pages, to remind yo

Sunday Sketch

Image
Today is my sweet Bailey-dog's 14th birthday. She is the first dog I ever loved, and she has a very special place in my heart. Today's sketch puts an equally sweet photo as your focal point, accented by cuteness and love. Start with a solid background color and a coordinating pattern for your mat. Then add another coordinating pattern as a border on the left hand side. Embellish it as you like with a sentiment that balances out the photo across the card. In honor of my Bailey, I used a puppy picture cut down from decorator paper. It's matted on a black card stock to make it stand out against the busy backgrounds. The background papers are from the same set of papers, as are the border and photo. This makes it easier to coordinate - which translate to less thinking. Yay! The card stock sticker phrase is matted with the same black card stock and is offset on the right to balance out the large photo. This card, along with many other paper crafts and wood gifts

A Weekend Of Stillness

Image
The day after Christmas is often just as busy, if not busier, than the days leading up to the holiday. We work to serve leftovers, return gifts and find after-Christmas sales. The busyness of our lives takes the place of what we're truly searching for: Peace. Calm. Rest for our souls. And, behold, the LORD passed by, and a great and strong wind rent the mountains, and brake in pieces the rocks before the LORD; but the LORD was not in the wind: and after the wind an earthquake; but the LORD was not in the earthquake: And after the earthquake a fire: but the LORD was not in the fire: and after the fire a still small voice. 1 Kings 19:11-12 Elijah wasn't able to find the Lord's voice in any of the noise and disturbances around him. It wasn't until the stillness came that he could hear the voice of God. Make this a weekend of stillness. Calm your heart and mind, lay aside the hustle and bustle of the season so you can hear God's voice in your life. Only in the

Merry Christmas 2015

Image
Fear not: for, behold, I bring you good tidings of great joy, which shall be to all people. For unto you is born this day in the city of David a Saviour, which is Christ the Lord. And this shall be a sign unto you; Ye shall find the babe wrapped in swaddling clothes, lying in a manger. And suddenly there was with the angel a multitude of the heavenly host praising God, and saying, Glory to God in the highest, and on earth peace, good will toward men. Luke 2:10-14

A Joyous Christmas Eve

Image

Chocolate Cappuccino Overload Crinkles

Image
These are the cookies I made for this weekend's cookie swap at the church. I wasn't at all sad that there were six leftover after the event... You might want to make two batches of these, as they will definitely go quickly, especially when people discover that they're flavored with coffee! Ingredients: 1/3 cup softened butter 1 cup packed brown sugar 2/3 cup cocoa powder 2 Tbsp instant coffee granules 1 tsp baking soda 1 tsp cinnamon 2 egg whites 1/3 cup vanilla Greek yogurt 1 1/2 cups flour 1/2 cup sifted powdered sugar 1. Preheat oven to 350 degrees. Line baking sheets with parchment paper. 2. Using your mixer on medium speed, beat the butter until creamy. Add brown sugar, cocoa powder, coffee granules, baking soda and cinnamon. 3. Beat in the egg whites and yogurt. 4. Slowly add in the flour, waiting to add more until all combined. 5. Sift powdered sugar into a small bowl. Make 24 balls out of the sticky dough, then roll each one in the powdered

Hosting A Christmas Cookie Exchange

Image
 What better way to save some time and energy during the holiday season - and have some great fellowship - than to host a Christmas cookie exchange? We had one at our church this weekend, and we had so much fun! Everybody brought 2 dozen homemade cookies. (Well, for the most part. Some people brought more. We decided that wasn't a problem at all.) As each plate came in, we numbered it, wrote down what it was and who brought it on a secret sheet of paper. The white tags you see are just card stock folded into a tent - number and kind of cookie only, no names. To begin the afternoon, we passed out ballots to vote in four categories: most festive, most original, most creative and best overall cookie. This was the most difficult part for people, as they couldn't touch and they couldn't eat as they made their choices. Then we had three Christmas-themed games, and the winners were allowed to go through the line and pick out their 2 dozen cookies to take home firs

Hot Cocoa Melters

Image
Today is our church's Christmas cookie swap, and I'm so excited to see all the goodies people are bringing. We'll also have a hot cocoa bar, and these melters, a combination of marshmallow, chocolate and peppermint, are all ready to go! This is all you'll need: mini candy canes, large marshmallows, dark chocolate chips and parchment paper. Melt the chocolate chips in the microwave 20 seconds at a time, stirring until smooth. Keep half the candy canes whole and crush the rest in a plastic bag. The smaller the better here.  Press the candy cane into the top of the marshmallow. Dip in the chocolate, wiping a little off the bottom. Then dip in the peppermint, sprinkling it on nice and thick to cover completely. Place them on the parchment paper and place in the refrigerator until solid. Then just drop them into you hot cocoa and they'll melt all nice and gooey.

Experiences, Not Things

Do you have gads of storage space in your home? Empty shelves lining the walls? Time to change outfits several times a day and rotate all of your stuff every day so it all gets seen? I'm guessing the answer to all of these questions is a resounding no. I don't either. But these are our default options when we're shopping for gifts. We opt out of being creative and go with the same things we always get - for better or worse. Would you rather have stuff to show or memories to share at this time next year? What would happen if you gave your loved ones the opportunity to collect moments instead of dust-catchers? What would be better than a full photo album or scrapbook next December? As you're brainstorming last-minute gift ideas this week, steer clear of the normal, the advertised and the typical. Don't give stuff - we all have enough stuff. Too much stuff. An overflowing amount of stuff. Instead, think about experiences. Shared experiences. Memorable exper

Antique Music Christmas Tags

Image
Christmas is a wonderful opportunity for crafters to use up many of their scraps and supplies. Think about tags, ornaments, gift bags and stocking stuffers - something made from those little pieces you've stashed away can be the best, brightest gift for those you love. These gift tags are a perfect example. I used one of my favorite, though long-ago-retired stamps to make the tag itself from a piece of decorator paper. If you don't have something like this, you can always use an already-made tag as a template or cut one out by hand. Once stamped and cut out, it looks like a piece of vintage sheet music.  A few swipes of black ink on the edges give it even more of a distressed look. Then mount it on coordinating decorator paper and ink those edges as well. Then decorate it with some great embellishments! You can either use them yourself as gift tags or ornaments, or you can give a set of them as a gift for someone special.

Christmas Cookie Trees

Image
I was on an acorn-themed spree this fall, and apparently I'm having a Christmas tree-themed week during Christmas. This one, unlike the lighted ones yesterday, is completely and deliciously edible. Start by mixing up your favorite cookie dough. Then make three cookies with 1/4 cup of dough each. These will be the largest and the base of your tree. Then make them gradually smaller, in sets of three, until you have itty bitty yummy cookies. The largest ones will need about 7 minutes to bake, while the smaller ones should only take 5 minutes. The edges will be slightly brown and you can flatten them a little to make them easier to stack. Because I was taking these to share at the church, I frosted each layer and added a little drizzle to the edges, then shook on some holly berry sprinkles. For travel safety, I made five small stacks and put them together at the church. They ended up in two trees because one big tree was a little top-heavy. I only had one cookie to

Tomato Cage Christmas Trees

Image
Sharing the light of Christ this Christmas season doesn't have to cost you tons of money. Just lighting up your home will make it warm and cozy, and these tomato cage Christmas trees will spread light and love to everyone. Start with two tomato cages, four garlands and a string of lights. I tied two 9-foot garlands together for each tree. You'll want to wind it up through the cage, wrapping it around the upright posts on every layer to secure it. They might not look like much at this point, but they're about to be spectacular. Wind the lights around in the same pattern as the garland. This is a 40-foot string, and it fit perfectly on the two trees. Now light them up and enjoy the glow of Christmas.

Christmas Traditions To Share With Your Husband

While many of the Christmas activities planned center around the children in your family, a little adult time is a great holiday treat, too. Make this the year that you start a Christmas tradition (or rekindle an old one) with your husband. Here are a few ideas to get you started. Let me know if you have some of your own to share. - Hot cocoa cuddling - Favorite Christmas movie night - A Christmas light drive - Present-a-day or card-a-day through December - Gift certificates as IOUs for the next year - Dinner for two somewhere special during the week of Christmas - An Advent calendar - Volunteer at a local non-profit together - Choose a new ornament for the tree - Write a letter with a photo from you favorite memory from the year - Bake cookies, make candy or fix dinner together - Go shopping for a child in need

Holiday Baking Pans

Image
At the end of each holiday season, I check out the stores' clearance sections for marked-down baking items. This is why I have an entire section of my pantry full of pans, decorations and sprinkles. I practically have a drawer full of sprinkles ... is that wrong? In last year's Christmas sales I found this adorable wreath pan. It's designed for cookies, and when you stack them all up, you get a sweet little wreath. Cookie pans are great fun since many of the baking companies release limited edition holiday-themed cookie mixes throughout the year. I wish I could show you the finished product, but this is the best I can do. I barely got them on the plate at church when the bow and several of the leaves mysteriously went missing. It's interesting how that works. So check out the after-Christmas sales in a couple of weeks to find something fun for next year's baking!

Birdseed Christmas Ornaments

Image
Our human loved ones aren't the only additions to our Christmas list! Treat your feathered friends to a special holiday gift, too. You'll need: 3/4 cup flour 1 packet unflavored gelatin powder 3 Tbsp corn syrup 1/2 cup water 4 cups birdseed Christmas cookie cutters baking sheets parchment paper straws nonstick cooking spray twine 1. Mix the flour, gelatin, corn syrup and water together to make a paste. If it's too runny, add a little more corn syrup. 2. Fold in the birdseed until completely coated. 3. Cover the baking sheets with parchment paper and lay out your cookie cutters. Spray them liberally with nonstick spray. 4. Fill each cookie cutter with the wet birdseed mix, pressing it in tightly. You'll need to use your fingers to spread it into the corners. 5. Cut a straw into three pieces and press each one into the top of the shape. Once removed, these holes will be for your hanger. 6. Once they are all filled, leave them out to dry for 4-

It's Beginning To Smell A Lot Like Christmas!

Image
Not only is this combination the perfect blend for Christmas, it's also a completely natural deodorizer. Lemon, rosemary and vanilla blend in beautiful harmony, plus you can use it two days in a row without losing any of the aroma. (But longer than that and it's a little potent.) Fill a saucepan two-thirds of the way with water. Add lemon slice and five or six springs of rosemary. If you don't have fresh, you can use rosemary leaves - start with about three tablespoons and add more if you can't smell it enough. Two tablespoons of vanilla complete your aroma profile. Simmer for as long as you want - it will last all day - but don't leave it unattended. Then just cover it overnight and use it for one more day.

Dipped Peppermint Chocolate Cookies

Image
You don't have to bake up a whole batch of homemade cookies to have a sweet holiday treat. Three ingredients and a few minutes later - presto! You have a Christmas-themed treat. You'll need: 1 package holiday Oreo cookies (I used peppermint) 2 squares almond bark Christmas-themed sprinkles 1. Melt the almond bark according to the directions on the package. It's generally 1 minute in the microwave, stir and 20-second intervals until completely melted. 2. Dip half the cookie in the melted bark, trying very carefully not to squeeze too hard and separate the cookie halves. This is probably the most challenging part of the whole project. 3. Immediately sprinkle with sprinkles. I used tiny peppermint candy canes and holly berries from a Christmas set of decorations. 4. Allow to chill in the refrigerator until completely solid. Let them sit out for a few minutes before serving.

Rustic Paint Stir Stick Stars

Image
Why spend a fortune on holiday decor when you can make something special and unique? Turn a project like these paint stir sticks stars into a family activity and they'll "stir up" memories each year when you bring them out. See what I did there ... stir? Sorry. To make these rustic stars, you'll need five paint stirrers (which you can usually find at the home store), hot glue and twine. If you'd like to add a Christmas phrase or Bible verse, print one of those out, too.  Start by hot gluing the sticks together. Because of the way they're stacked, some parts of the sticks overlap but they don't touch. Don't worry about that - if you try to glue them down, they'll just pull up while they're drying. Instead, concentrate on the places that overlap naturally. Allow them to cool and dry for a few minutes. After putting a small dot of hot glue on the back of the sticks (the side with the writing), wrap the twine ar

Winter Snow Mini Album

Image
Have you already had your first snowfall of the season? We had an inch recently, but it disappeared the next day. I'm still dreaming of a white Christmas.  Any crafter will tell you that the worst part of the creative process is finding the supplies you want to make the project that's in your head. That was my predicament when I wanted to make this snow-themed mini album. I knew the size and shape I wanted, but I couldn't find anything remotely close to  that in stores. So I made my own - and you can, too. Start by cutting 5-inch squares from heavy cardboard. Just score them on your paper trimmer and finish cutting through with scissors. Punch holes through each page for the binder rings. Cover one side, then punch through the holes in the cardboard. Cover the other side and punch those holes, too. When you're done, string the pages onto the rings in the order you want. Alternate papers throughout the album or make facing pages m