Posts

Showing posts from November, 2015

The 25 Books Of Christmas

Image
Now that I'm 30-something years old, I get to give myself a Christmas present! Ok, so I put a gift in my own stocking a couple of years ago because it was something small that I really wanted - but that doesn't really count, right? So I'm reading a story about Christmas, since it's almost December already, and they were promoting reading with children. The suggestion was to give them a stack of books on December 1 and let them open one each day until Christmas. I love this idea for two reasons: 1. I love books! 2. All children should be given the gift of reading. If you have children, I beg you to do this for them. You don't have to spend a fortune, either. Just keep your eyes open for books at sales, thrift shops and consignment stores. The dollar store here always has shelves full of books, and there's usually a bin of kids' books at the grocery store, too. Don't stop there. Read with them. Have them read to you. Read in different voices.

A Day Of Thanks And Giving

Image
On this special day, may the Lord bless the food before you, the loved ones around you and the love between you. Happy Thanksgiving!

Words For Wednesday

Image

DIY Fabric Napkin Rings

Image
'Tis the season to decorate your holiday table! And don't just bring out the same things you used last year - create something fun and different, something that everyone will enjoy. On our Thanksgiving table, we're going to use my holiday napkin fold. For more information on making it, click  here . The burlap and flower napkin ring pictured here is a variation on that theme. The other three napkin rings are made from two old sweaters and the jeans I used to make my craft shop apron . They're incredibly easy and fun to make. You could use this as a kids' craft at any holiday, or turn it into a seasonal tradition in your family. All you need are the sleeves from some old sweaters and paper towel tubes. Cut each tube into three or four sections, then cut the sleeve off the sweater, leaving the cuff.  Use hot glue to attach the sweater piece to the tube, leaving an overhang of fabric on either end. Then lay it down and glue th

Direct Responses To Your Questions

There are hundreds of questions asked in the Old Testament. Abraham asks how God could use two older people to bring life into the world. Moses questions why God chose him. The Israelites question Moses about wandering in the wilderness for so long. Gideon asks how God plans to use him to save Israel. On and on its goes. We may shake our heads at the wishy-washy tendencies of the Israelites as they wandered in the wilderness, but we might have done the same thing if we were in their sandals. We laugh at how Abraham thought he and Sarah were too old to have children, but isn't our God fully capable of doing anything? And we accuse Gideon of not having faith in the Lord's decisions, but we seem surprised when God answers prayers and uses us for His glory. The New Testament is no different. Now that Jesus was walking on earth, He was physically present to hear their questions. They weren't always pleased with the answer, but they were meeting face to face with the Son of G

Sunday Sketch

Image
It's so much fun to play with Christmas colors and patterns, and today's the day to get creative. This sketch starts with a simple patterned background. You can mat it on card stock for an extra layer if you'd like. Then pick a coordinating pattern, layer it with card stock and make a panel down the middle - like a runner on your dining room table. Stamp your sentiment and mat it on card stock, then punch a hole in the corner and tie it onto the panel with ribbon. Tuck a small image behind the ribbon and you're all set! For my card, I started with a green pattern that had several coordinating patterns and card stocks with it. The less thinking I have to do, the better. I took one of those patterns and matted it on green card stock so it would stand out from the other pattern and used it as my panel. Before adhering it to the card, I stamped my verse and matted it, then tied it up and taped down just the lower right hand corner. The ornament is just a

A Weekend Of Contentment

Image
Now that the days are getting a little chillier, it's not difficult to find the puppies. Just look for the patch of sunshine on the living room carpet. Oh look - there they are. While they still love to go outside and romp a little, they are perfectly content to just lay in the warmth and relax. Food and cuddles are also a must, but it's not unusual to see them just like this - all day. But godliness with contentment is great gain. For we brought nothing into this world, and it is certain we carry nothing out. And having food and raiment let us be therewith content.  1 Timothy 6:6-8 We could take a cue from our puppies. As long as they're fed, sheltered and loved, they're perfectly content. It's the humans in the house who worry and fret and strive to get more. Make this a weekend of contentment. Make a determined effort to be perfectly happy with what you have at this moment. Don't buy anything unnecessary, don't try to keep up with the Joneses an

Holiday Napkin Folding

Image
Is your table ready for the holidays? A fun napkin fold might be just the special touch you need to dress things up a bit. For this one, one of my favorites, you need paper napkins, burlap, twine and a fall-colored flower. To make these large enough for our silverware, I started with a 16x13-inch "guest towel" sized napkin. You can usually find these fairly easily around the holidays. Fold it in half with the crease on the left hand side. Fold up about 3 1/2 inches of the bottom. Then fold it up a second time to match. This should allow for your silverware to tuck in without sticking out over the top, but double check to be safe.  Flip the entire napkin over. Fold over about an inch on either side and crease them. Now that you have your pocket's size, cut a piece of burlap tall enough to cover the entire front flap and wide enough to wrap around it with a little overlap. Tie it in place with a small piece of twi

Donut Hole Acorns

Image
Here's a fun treat that only uses four ingredients, takes only a few minutes to put together and is absolutely adorable. It doesn't get much better than that! These donut hole acorns are perfect for a fall festival, treats for the kids or a little something special at breakfast. A variety of donut holes and the kinds of sprinkles you use will make them personally yours. You'll need: a box of donut holes hazelnut spread fall-themed sprinkles pretzel sticks Note: You won't need a huge bag of pretzels, as you'll only use half a stick per acorn. Unless you want to snack on pretzels all day. Then go ahead. Start by breaking several pretzel sticks in half. Do this first because your hands will be full and sticky later. Dip the top of each donut hole in the hazelnut spread. It's easier if you pour some into a small bowl with a wide mouth. Let the excess drip off or wipe it carefully on the edge of the bowl. If the spread runs, so will your sprinkles

Words For Wednesday

Image

Craft Show Apron DIY

Image
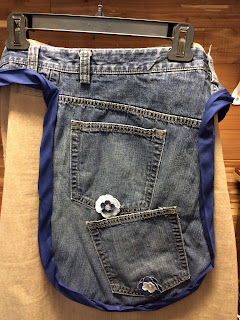
As we're preparing for another craft show here in town, I wanted to have a little something different to hold our money. We've found that it's a little cumbersome to go back and forth to a cash box, and a fanny pack is pretty dated. Instead, I found a picture of an adorable denim money apron and put my own spin on it. I'm not a seamstress by any means - I don't even really enjoy sewing - but I love this finished product. My special thanks to two of my Titus older women for their ideas and help. I found a pair of men's jeans at Goodwill just slightly larger than my size. This way they'll fit over whichever skirt I choose to wear, and the pockets will be deeper, since men's jeans have larger pockets than women's. Then I cut out the back right pocket. This one will become the bottom pocket of the finished apron. To figure out the size and shape of my apron, I layered the two pockets to find out how deep they would be ... ..

When You're The One Who Needs The Encouragement

That middle-of-the-week day was anything but middle-of-the-road. My heart was about as dark as the severe-weather storm-sky looked. And I felt about as useless as the "g" in lasagna. Nothing was really wrong, it was just that kind of day. As the skies opened up with thunder and torrential rains, I finally let the tears fall, too. When you're used to providing the encouragement and motivation, what do you do when you're the one who needs encouraging? Does admitting that you need encouragement mean that you've failed? Aren't you supposed to be the strong one, the motivated one, the one whose smile warms hearts and whose words spark something in other people? No. It only means that you're a normal, typical human woman who desperately needs God. Hear my prayer, O LORD, give ear to my supplications: in thy faithfulness answer me, and in the righteousness. And enter not into judgment with thy servant: for in thy sight shall no man living be justified.

Sunday Sketch

Image
Here's an incredibly fun sketch - and all you need is a circle punch! Using the circles as windows to the inside of the card, you can place any image or words behind them that you'd like. And a simple tied fiber on the left hand side keeps the focus on your lovely little windows. Before adhering your background paper to the card, tie your fiber around it so it will be sandwiched in the middle. This is much easier than having thread on the inside of your card when you open it. For my card, I cut a piece of cream card stock to fit the front of my card then matted the coordinating decorator paper on top. I used a brown and white baker's twine for my fiber and wrapped it around twice before tying the knot. This is the step of the process to adhere these three parts  to the front of the card. Then I punched three spaced circles down the right hand side, one size larger than my black chalkboard stickers. The stickers adhere to the inside of the card, so they're sti

A Weekend Of Planting Yourself

Image
It's interesting to walk by the side of the creek beds on the property. Trees that have been standing there for decades are slowly having their roots exposed by soil erosion. The base of these towering giants is now a mass of huge, twisted roots that keep it standing tall. The roots aren't just what you see here, though. They travel hundreds of yards in every direction, intertwining and spreading well beyond the immediate soil. Just being able to see their roots won't kill the tree or make it unstable to the point of collapse. It just means you can see its firm foundation. And he shall be like a tree planted by the rivers of water, that bringeth forth his fruit in his season; his leaf also shall not wither; and whatsoever he doth shall prosper. Psalm 3:1 Just because your roots are a little exposed doesn't mean that you're going to keel over. It just means that you've weathered the storms that have tried to weather you away. Your firm foundation goes we

DIY Wood Signs

Image
Stuff From Trees has been invited to another craft show, so we're working steadily to rebuild our inventory. We'll be part of the Ottumwa Eagles' Auxiliary Holiday Open House on Nov. 28, so we have only have two and a half weeks to finish getting ready. Instead of just making the same pieces over and over again, I've been playing around with different techniques and different projects. One of them, a fun version of the signs we use in our booth, is a chalkboard with wooden shapes on it. I thought about putting words down the middle, but won't it be more fun for the buyer to write all over it themselves? I thought so, too! I started by very sweetly asking Danny to cut my 1-foot-square boards. I sprayed each one with 4-5 coats of chalkboard paint, following the directions on the can. While I was making the magnets we sell at our shows, I also painted a variety of larger shapes like stars and hearts. Some took a couple of coats to get them all

Garlic Monkey Bread And Cinnamon Sugar Monkey Bread Mini Loaves

Image
Do you find yourself making the same meals over and over again with no end in sight? Change one little thing and it will seem like a brand-new recipe! I tried that this week, and we had two adorable variations of a monkey bread recipe. The miniature loaf version also keeps your portion size under control, which is an added bonus. Try them for yourself and see if you prefer the garlic bread version or the cinnamon sugar one for dessert. Mini Garlic Monkey Bread Ingredients: 1 can refrigerated buttermilk biscuits (10 per can) 6 Tbsp melted butter (half a stick) 2 Tbsp minced garlic 1/4 cup shredded cheddar cheese 1. Preheat oven to 400 degrees. Spray four miniature loaf pans with nonstick cooking spray. 2. Combine butter and garlic in a bowl. 3. Cut each of the 10 biscuits into fourths. Place the biscuit quarters into the bowl and stir gently to coat. 4. Layer 10 quarters in each mini loaf pan. Divide the cheese evenly, sprinkling it over the top.

Words For Wednesday

Image

Fall Themed Gift Bag Decorations

Image
It's so much fun to put gift bags together for the holidays, and we can't leave out fall and Thanksgiving. Whether you're hosting a fall festival or having everyone over for Thanksgiving dinner, give everyone a special autumn-themed treat. Plastic bags come in all different sizes and are perfect for small gifts. Here I cut a piece of textured card stock just wider than the bag and then folded it in half. Two acrylic images and three punches later I had an adorable bag topper. Use double-stick tape along the edges to adhere it to the bag. For this one, I used glue dots to attach a piece of brown textured card stock to a short length of ribbon that I cut a notch out of at the bottom. Then I added a card stock sticker phrase and a foam leaf sticker to the corner. It's not taped to the bag this time, but clipped on with a miniature clothes pin. And if you have some adorable themed ribbon (check your local dollar store), you don't need paper a